How to configure xdebug with Lando & VS code for Drupal Development
Authored By : tdnshah
Published On
Sunday, Apr 23, 2023
After ssearching for hours and many attempts I was able to connect my Lando based Drupal development enviornment with xdebug. As there is no straight forward resource available, you will find many artcles showing how to connect xdebug with phpstrom and lando but no resource is found across connecting xdebug with vscode lando.
If you are also facing problem connecting vscode and lando with xdebug you have came to the right place in this article we will be looking at the same in a step by step manner.
Step 1 : Installing VScode’s php xdebug extention
We need to enable the php xedug extension for vs code, this can be enabled by navigating to extension manager in vs code and searching for “php Debug”
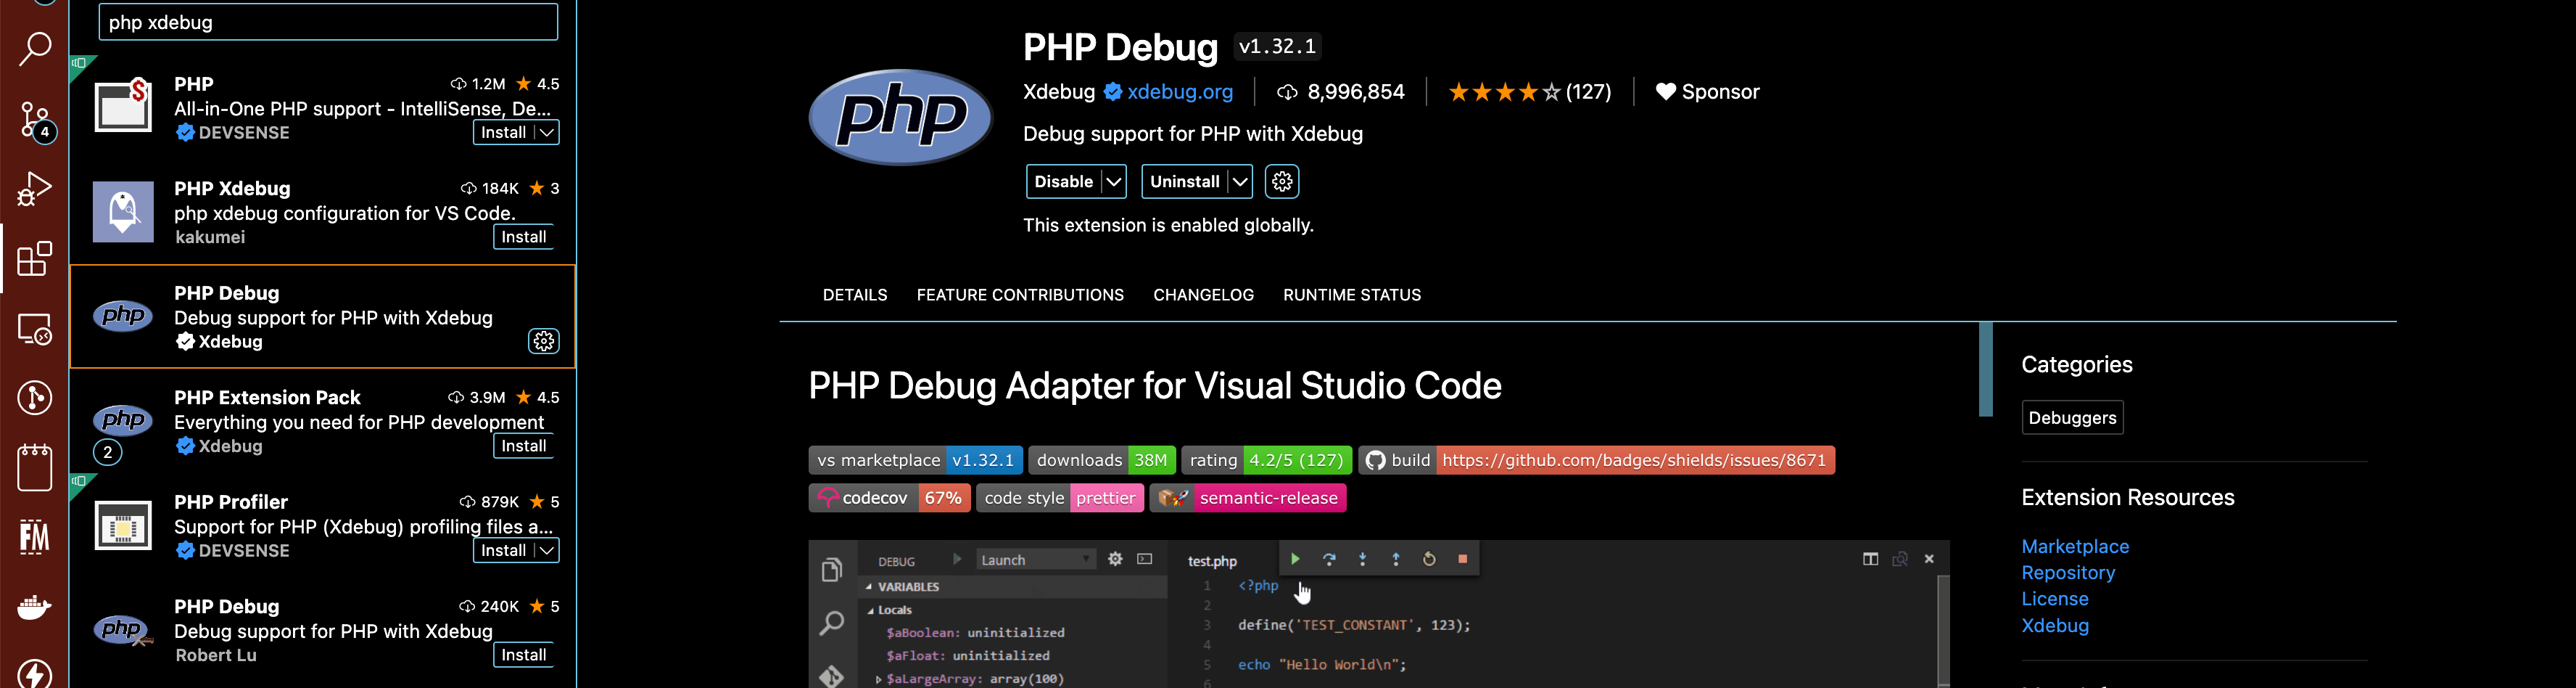
In the search results you need to look for PHP Debug which is provided by xdebug official group and it has a tick mark lable on it, click on the install button provided in the bottom right of the menu item.
Once installed you are done with the setup 1.
Step 2 : Enable Xdebug in your lando.yml file.
Lando’s Drupal images for all version comes pre-installed with xdebug but it is disabled by default. So you need to specify this in the lando.yml file of your application/development enviornemnt.
You can do so by adding xdebug: debug to the appservice and then rebuild your lando instance.
here is an example lando.yml which has xdebug enabled.
File path :project-root/lando.yml
name: acms-dev-portal
recipe: acquia
config:
  webroot: docroot
  xdebug: debug
  php: '8.0'
services:
  phpmyadmin:
    type: phpmyadmin
  appserver:
    xdebug: debug
    config:
      php: .lando/php.ini
In the above file there are two things you should give attention to
- php: .lando/php.ini, We are passing a custom php.ini file, this file will hold the configuration for xdebug php configurations.
- xdebug: debug, we are enabling xdebug by setting the key xdebug to debug
Step 3 : Create and configure custom php.ini file for lando.yml .
We need to add some configurations to enable and connect php with xdebug, as we are running php in a lando container we need to extend the php.ini settings inside the lando container. Hence to add this custom settings to the lando php.ini we need to create a php.ini file in the project root and then pass the path to this php.ini file to lando.yml as mentioned in Step 2.
You can actually create this file at any location in your project root directory, just make sure you update the your .lando.yml accordingly.
- Filename: .lando/php.ini
[PHP]
xdebug.max_nesting_level = 256
xdebug.show_exception_trace = 0
xdebug.collect_params = 0
xdebug.mode = debug
xdebug.client_host = ${LANDO_HOST_IP}
xdebug.client_port = 9003
xdebug.start_with_request = yes
xdebug.log = /tmp/xdebug.log
Here if you check the above configs we are
- xdebug.client.host is set to lando containers ip address.
- xdebug.client.port is set to port number 9003. (Note: All latest lando containers use xdebug 3 hence the default port on which xdebug 3 runs is 9003 earlier versions of xdebug uses port number 9000)
Step 4 : Configure VS Code to run debugger and connect to the lando xdebug environment.
In you project root create a .vscode directory.
In this new directory create a lauch.json file. The path should look like project_root/.vscode/launch.json
Filename: project_root/.vscode/launch.json
{
    "version": "0.2.0",
    "configurations": [
        {
            "name": "Listen for Xdebug",
            "type": "php",
            "request": "launch",
            "port": 9003,
            "log": true,
            "pathMappings": {
                "/app/": "${workspaceFolder}/",
            },
            "xdebugSettings": {
                "show_hidden": 1
            }
        }
    ]
}
Conclusion:
All the above configurations should get you up and running with xdebug enjoy debugging and resolving bugs 🐛
Attributions
The above article was written reffering the below resources and we woulld like to give a special thanks all mentioned below.
Please give us your feedback on our articles and if you find them helpful, click the thumbs up icon to motivate us to write more.